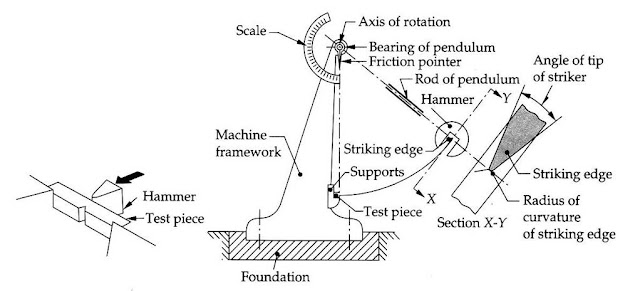
CHARPY V NOTCH IMPACT TEST


CHARPY V NOTCH IMPACT TEST

Object: To determine the amount of energy absorbed in fracturing a standardized test piece at a specified temperature.

Method: A machined, notched specimen is broken by one blow from a pendulum. Because scatter occurs in the results, at least three specimens are used to assess the joint represented. Testing is carried out at a temperature specified in the appropriate application standard.

CHARPY V NOTCH IMPACT TEST
Reporting Results:
  1. Location and orientation of the notch. 
  2. Testing temperature.
  3. Energy absorbed in joules. 
  4. Description of fracture appearance.
  5. Location of any defects.
CHARPY V NOTCH IMPACT TEST

The Charpy impact test, measured in joules, is an assessment of TOUGHNESS. Transition temperature (curve) in steel.


Popular posts from this blog

The Brinell Hardness Test

The Brinell Hardness Test The Brinell hardness test method consists of indenting the test material with a 10 mm diameter hardened steel or carbide ball subjected to a load of 3000 kg. For softer materials the load can be reduced to 1500 kg or 500 kg to avoid excessive indentation. The full load is normally applied for 10 to 15 seconds in the case of iron and steel and for at least 30 seconds in the case of other metals. The diameter of the indentation left in the test material is measured with a low powered microscope. The Brinell harness number is calculated by dividing the load applied by the surface area of the indentation. The diameter of the impression is the average of two readings at right angles and the use of a Brinell hardness number table can simplify the determination of the Brinell hardness. A well structured Brinell hardness number reveals the test conditions, and looks like this, "75 HB 10/500/30" which means that a Brinell Hardness of 75 was obtained us...

FILLET WELD FRACTURE TEST

FILLET WELD FRACTURE TEST Object :  To break the joint through the weld to permit examination of the fracture surfaces for flaws and to check root penetration and fusion. Method: The specimen is cut to length and a saw cut, normally 2 mm deep, is made along the center of the weld face. The specimen is fractured by bending or hammer blows. Reporting Results: Thickness of parent material.  Throat thickness and leg length.  Location of fracture. Appearance of joint after fracture. Depth of penetration / lack of penetration or fusion.

VISUAL INSPECTION OF WELDING

VISUAL  INSPECTION OF WELDING INTRODUCTION Inspection starts with examination of the material prior to fabrication, scabs, seams, scale or other harmful surface conditions may be detected in visual inspection. The inspector should check the following : Weld preparation, dimensions and finish.  Clearance dimensions of backing strips.  Alignment and fit up to the pieces being welded.  Verification of cleanliness.  Visual Inspection During Welding Visual inspection checks details of the work while welding is in progress. Among the details to be checked are : Welding process.  Cleaning.  Preheat and inter pass temperature.  Joint preparation.  Filler metal.  Flux or shielding gas.  Chipping, grinding, or gouging.  Post heating temperature and time.  Visual Inspection After Welding Visual inspection is useful for finished-product verification of such items as : Profile irregularities of the weldment....